Step 1: Open the MeGUI.exe

Step 2: Go to Tools >> File Indexer (CTRL + F2)

Step 3: On the File Indexer window, input the source video to be encoded(a), then click the Queue button on the lower right(b).

Step 4: After queuing on the File Indexer, the job/s should appear on the MeGUI window, on the Queue Tab(c). When ready, click on the Start button at the bottom left of the window(d).
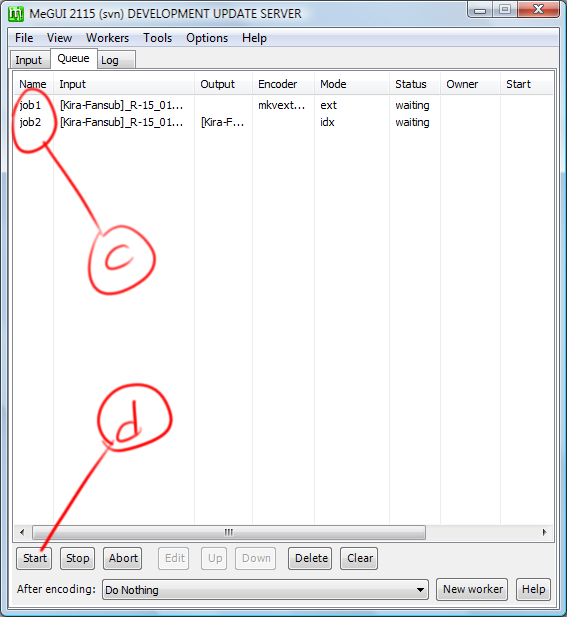 |
| On the example's video source, two jobs are queued: the audio extraction and ffms indexing. |
Step 5: A little job process window will pop up, just let it finish doing the file indexing. After the jobs are done, the job processing window will automatically close and two new windows will appear.
 |
| Avisynth Script Creator (AVS Creator) |
You most probably want to make an Avisynth Profile for encoding multiple videos. As of me, I have my own profile for personal needs setup on this video, which is:
- Resize Filter : Spline36 (Neutral)
- Noise Filter : Minimal Noise
- Color Correction : (yes)
- Clever (TM) anomorphic encoding : (yes) Resize to mod16
I also downscaled the video output from 1920x1080 px into 1280x720 px which is also based on my own preference. I never want to mess up with the default DAR of the source video which is 1.778 (9:16 widescreen ratio).
Another note about avisynth script creator: since we will use the AutoEncode feature of MeGUI later, we don't need to specify the Output Video. MeGUI itself will pick it up and mux all of the tracks (video, audio, subs, chapters) into one mkv output.
Step 6: On the "Filters" Tab of AVS Creator, let's finalize everything before saving the video script.
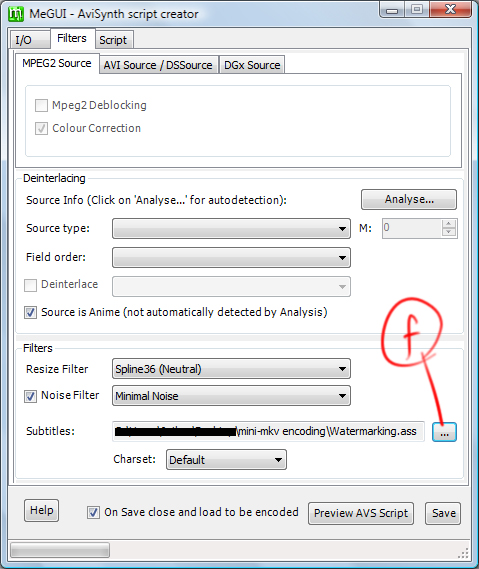
Since I used an anime as a video source on example, I ticked the checkbox with "Source is Anime" label. The subtitles input on the avisynth script is actually a hard-sub, and most of the time we don't want to do that on mini mkv encoding.
Hardsubbing is rendering the subtitles as part of the video itself, and therefore decreases the compressibility of video in encoding. But I made my own watermark for my videos, which was made by me using Aegisub. This watermark appears only on the first few seconds of my encoded videos. If you also prefer subtitle water marking, you might want to use the subtitles feature of the avisynth script creator.
After everything has been set up, click the Save button on the lower right part of AVS Creator window.
Step 7: After creating the AVS, the video preview will pop up again, but this time showing the video result after applying the AVS.
 |
| Preview of AVS Creator video output |
This is the part where I check if I resized the video correctly and if the watermark has been set up properly to appear on the first few seconds of the video. Since the watermark shows correctly, and the video is downscaled correctly too into 1280x720 px widescreen ratio, it means that the script is ready to go.
After checking everything, you may close the final preview window.
Step 8: Going back to the main MeGUI window, we need to set up the video and audio encoder settings.

This is the tricky part, since different types of videos demands different types of advanced settings for different people's preferences. For example, some people might want to encode videos with a resolution of 640x480 px and with a file size of only around 35MB.
Many factors are to be considered when setting up a video encoder profile. Some are:
- The encoding mode is to be used: CRF for constant quality at certain level, ABR for dictating file size.
- The type of video source: Anime and Cartoons demand less file size to attain a certain quality level than live-action videos, especially the vintage anime which had less complicated cel coloring. The motion levels in the video plays a factor: Brave 10 most likely will demand more bit rate than Nichijou.
- The level of video quality you want as an encoder: This will be based on your own trial-and-error.
- The amount of time an encoding process will take: Settings that yield better results usually takes more time, but it doesn't mean that the best choice is the settings which will take the longest encoding period when you have to consider the quality gain over the time required ratio. It would waste more of your precious time to increase encoding time from 1 hour to 5 hours just for a quality gain which is almost unnoticeable. It's your choice though, if what efficient may mean for you.
I highly encourage anyone to try and determine their own profiles, but if you really don't know where to start, I have some tips for you.
Browse some relevant communities
Check out other encoder's settings to get an idea (but never plagiarize other's settings).
You can start from there, then try to determine which settings gives you good results based on your own preferences (in target file size, resolution, quality of output, etc.)
 |
| Try seeing other encoder's settings to gain idea. This sample video is also one of my mini mkv encodes. |
You can start from there, then try to determine which settings gives you good results based on your own preferences (in target file size, resolution, quality of output, etc.)
About the audio encoding, since we are trying to make a mini mkv, the aim is to minimize the audio file size while maintaining a decent audio quality. Encoders have almost the same settings on the audio encoding, so I might as well share my own settings as well.

It would be wise to save your own Audio/Video encoder profiles, so you can use it again and again for similar encoding specifications. After setting the encoders, on the main MeGUI window click the AutoEncode button on the lower-right most part.
Next topic would focus on the AutoEncode settings, which have a bunch of settings which is needed to be elaborated one by one.
No comments:
Post a Comment